Vue + Spring boot build 설정
VueJs 공식 홈페이지와 맨땅에 개발하기 님 유투브 영상을 보고 기본적인 문법을 습득 했다.
유투브에서 검색해서 이곳 저곳 봤는데, 맨땅에 개발하기 님의 유투브 영상이 가장 이해하기 좋았다.
이미 Vue 뉴비들한테는 유명 하신 분인 것 같다. ㅎ
개인적으로 블로그에 기록 하는 것도 귀찮음이 큰데, 그렇게 영상을 제작해서 올려주시는 분들을 보면 대단한 것 같다..
이 글을 통해서 친절하고 이해 하기 쉬운 강좌에 감사를 표하고 싶다.
스프링 부트에서 프론트를 VueJs로 백엔드를 SpringBoot로 하는 개인 프로젝트를 만들어 가면서 공부 하기로 목표를 잡고, 적당한 강좌나 책등을 봤는데
일단은 책에 나오는 예제를 쭉 따라가 볼 예정이다. 화이팅!!
오늘은 스프링 부트에 프론트 VueJs 개발 환경 설정을 기록 하고자 한다.
이 부분은 책(스프링5와 Vue.js2로 시작하는 모던 웹 애플리케이션 개발)과 구글링에서 참고 하였다.
-
우선 스프링 부트 프로젝트를 생성한다.
- 다음 vue 프론트 개발 환경을 생성한다.
-
사전에 npm과 vue-cli를 설치가 되어 있는 환경 이어야 한다. (이전 페이지에서 다루었으므로 설명은 생략)
-
생성한 스프링 부트 프로젝트 root 폴더에서 Vue 프로젝트를 생성한다.
-
vue create front-end -
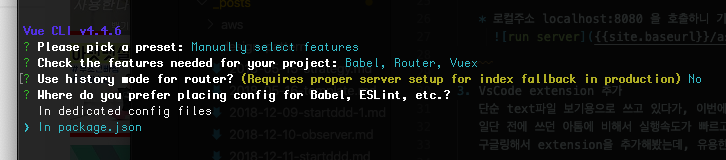
vue 프로젝트 설정은 다음과 같이 했다. (바벨, 라우터, Vuex, configfile은 package.json)
-
vue project가 생성된 다음 파일 구조는 다음과 같다.
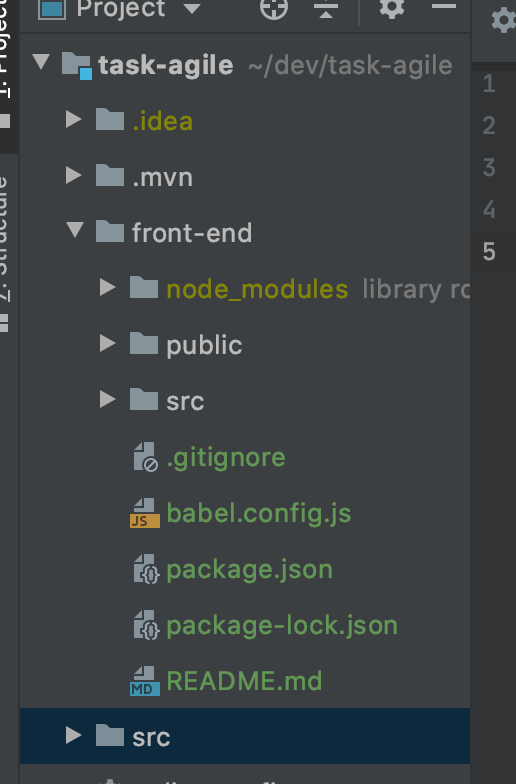
-
-
프론트 개발환경은
localhost:3000백엔드는localhost:8080에서 작동하도록 하게 설정하는 것으로 잡았다.
헌데 이렇게 하면, 프론트에서 백엔드를 호출 할때 cross-origin 요청 제한 문제가 생길 수 밖에 없는데,
이 문제를 해결 하기 위해서는 vue쪽 환경설정에 http proxy를 설정해줘야 한다.- 스프링부트는 기본 포트가 8080 으로 수정할 것이 없다.
- front-end 폴더에 vue.config.js 파일을 생성하고 아래와 같이 설정 한다.
 const path = require('path');

 module.exports = {
   devServer: {
     port:3000   //개발하는 동안 프런트엔드 페이지를 띄우는 포트
   },
   proxy: {
     '/api/*' : {
     target: 'http://localhost:8080' // /api 요청을 할때 백엔드 호출
     }
   }
 }
- 스프링 프로젝트가 빌드 될때, vue 프론트 엔드도 같이 빌드 시키기
지금까지는 개발 환경을 셋팅 하였다. 개발이 완료 된 후 스프링 application에 프론트 결과 문이 같이 빌드 되려면,
vue 프로젝트의 빌드 결과 파일들을 app 안의 resource/ 로 옮겨 줘야 한다.1. front-end 빌드(npm build) 2. js 빌드 결과 파일 -> main/src/resource/static 로 이동 3. html 파일 -> main/src/resource/templates 로 이동
이런 작업을 매번 수동으로 하려면 번거로우니, spring 프로젝트가 빌드될때 위와 같은 과정이 진행되도록 pom.xml에 설정한다.
- plugins 에 exec-maven-plugin 플러그인을 추가 하고 executions에 실행 명령어들을 추가 설정 한다.
<plugin> <groupId>org.codehaus.mojo</groupId> <!-- 명령어를 실행 시키도록 해주는 plugin --> <artifactId>exec-maven-plugin</artifactId> <version>1.6.0</version> <executions> <!-- npm install --> <execution> <id>front-end install</id> <goals><goal>exec</goal></goals> <phase>prepare-package</phase> <configuration> <executable>npm</executable> <arguments><argument>install</argument></arguments> </configuration> </execution> <!-- npm run build --> <execution> <id>front-end build package</id> <goals><goal>exec</goal></goals> <phase>prepare-package</phase> <configuration> <executable>npm</executable> <arguments> <argument>run</argument> <argument>build</argument> </arguments> </configuration> </execution> </executions> <configuration> <workingDirectory>${basedir}/front-end</workingDirectory> </configuration> </plugin> - 프론트 엔드의 빌드 결과 파일들을 spring app로 이동 시킨다.
<plugin> <artifactId>maven-resources-plugin</artifactId> <version>3.1.0</version> <executions> <!-- disc 폴더 에서 html 파일을 /src/main/resources/templates 로 이동--> <execution> <id>copy front-end template</id> <goals><goal>copy-resources</goal></goals> <phase>prepare-package</phase> <configuration> <outputDirectory>${basedir}/src/main/resources/templates</outputDirectory> <resources> <resource> <directory>front-end/dist</directory> <includes><include>index.html</include></includes> </resource> </resources> </configuration> </execution> <!-- disc 폴더 에서 html 파일을 제외하고 /src/main/resources/static 폴더로 이동--> <execution> <id>copy front-end static assets</id> <goals><goal>copy-resources</goal></goals> <phase>prepare-package</phase> <configuration> <outputDirectory>${basedir}/src/main/resources/static</outputDirectory> <resources> <resource> <directory>front-end/dist</directory> <excludes><exclude>index.html</exclude></excludes> </resource> </resources> </configuration> </execution> </executions> </plugin> - 이런 과정들은 spring app가 packaging 되기 전에 진행 되어야 한다.
<phase>prepare-package</phase>라고 설정해준다.
이제 spring boot + vuejs 개발 셋팅이 되었다. 고고싱~!!