스프링 클라우드 버스
2018, May 31
스프링 클라우드 환경에서 환경설정 정보(깃등에 저장한 property)를 변경을 하면,
config server는 바로 반영 하지만 config server를 바라보는 마이스크로 서비스는
자동으로 갱신된 정보를 가져가지 못한다.
- Spring Cloud Config와 Clinet설정은 이전글 참고
환경설정 정보를 최신화하려면 각 마이크로서비스의 /refresh 엔드포인트를 호출 해야 한다.
마이스크로 서비스가 한 두개가 아닌 경우 일일히 호출해주는 것도 만만한 일이 아닐 것이다.
스프링 클라우드 버스는 이런 문제를 해결해 주기 위한 서비스이다.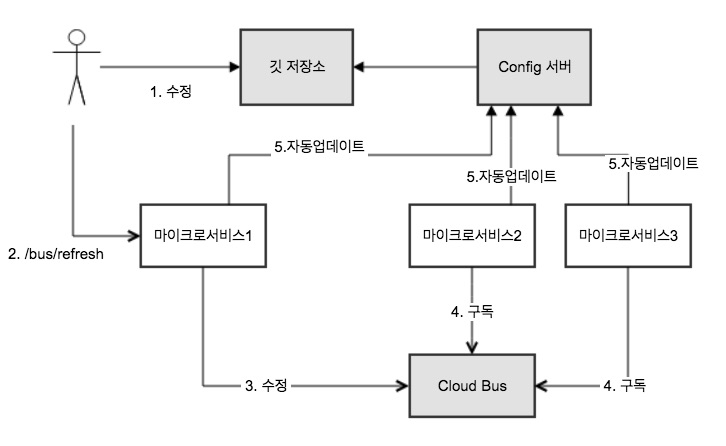
본격적으로 설정을 위해
레퍼런스을 방문 하였다.
dependency에 spring-cloud-starter-bus-amqp나
spring-cloud-starter-bus-kafka둘 중 하나를 추가하라고 하는거 보니, Message Queque를
이용해 /refresh를 전파하는 방식이라는 것을 알 수 있었다.
따라서 메세지를 저장할 서버가 별도로 필요하다.
-
RabbitMq를 설치
RabbitMq를 사용하기로 선택하여서 RabbitMq를 설치했다.
- 설치는 RabbitMq 홈페이지에서 다운을 받거나 Docker통해 설치하면 된다. -
Config서버 설정
pom.xml <dependency> <groupId>org.springframework.cloud</groupId> <artifactId>spring-cloud-starter-bus-amqp</artifactId> <version>1.3.4.RELEASE</version> </dependency>bootstrap.yml server: port: 8888 spring: cloud: config: server: git: uri: https://github.com/xxxx/spring-cloud-config.git rabbitmq: host: localhost port: 5672 username: guest password: guest management: security: enabled: false- 각 마이크로서비스에 /refresh를 전파하기 위해서는 메세지 발행(publishing)이 필요한데,
actuator/bus/refresh를 통해 가능하다. - 테스트를 위해 actuator호출시 security 적용을 해체 하기 위해 management.security.enabled설정을 false로 했다.
- 각 마이크로서비스에 /refresh를 전파하기 위해서는 메세지 발행(publishing)이 필요한데,
-
Client서비스 설정
pom.xml <dependency> <groupId>org.springframework.cloud</groupId> <artifactId>spring-cloud-starter-bus-amqp</artifactId> <version>1.3.4.RELEASE</version> </dependency>bootstrap.yml spring: application: name: product-service profiles: active: dev cloud: config: uri: http://localhost:8888/ rabbitmq: host: localhost port: 5672 username: guest password: guestapplication.yml server: port: 8081 management: security: enabled: false -
테스트
- RabbitMq서버 실행!(설치된 위치와 실행방법은 홈페이지 Document를 참고)
./rabbitmq-server
-
여러개의 서비스에 전파되는 것을 확인 하기 위해 client프로젝트를 복사하여 port변경
서비스1 : port 8081 , 서비스2: port 8082
-
git에 있는 property 변경 (원래 item-dev-api.myhost.com 였음)

-
Config Server의 액츄에이터
/bus/refresh호출$ curl -X POST http://localhost:8888/bus/refresh
-
두개의 client서비스 모두의 환경 설정 정보가 변경 된 것을 확인 할수 있었다.


- RabbitMq서버 실행!(설치된 위치와 실행방법은 홈페이지 Document를 참고)
- 예제 GitHub : https://github.com/lovia98/spring-cloud-example